To Sponge or Not to Sponge...

Saturday, April 28, 2012

To sponge or not to sponge, that's the question. My plan for this post was to make two identical cards. One sponged and one not. I wanted to evaluate them side by side (I work best with visual aid). I’ve always admired sponging on cards (other peoples cards). But when I've tried my hand at sponging, it always looks like I dropped my card in the middle of a big mud puddle! Now, I defiantly like the sponged look. I feel it has a prominent place in papercrafting. How else could you add age and a vintage feel to any project without it? However, for my taste, I think I need more practice. I'm a little heavy handed.

The sponged card:


The non-sponged card:


Somehow, during the creative process the non-sponged card seemed to grow, expand, get fat!  I don't make fat or lumpy cards!  Now, I do admire, sometimes even drool over cards with layers and layers of beauty, but then think...how would I possibly mail something like this? What a great idea for another post. 

To give you a visual point of reference, I love to peruse the My Favorite Things blog.  These cards are so adorable with all of their layers, die cuts, embellishments, ribbon, buttons, stitching, and bling.  Not to mention the beautiful Copic work.  Am I still trying to define my style?  No, I hope not!  I thought I had already traveled down that path.  Honostly, I've always thought of myself, and my style as Plain Jane.  You know, the vanilla ice cream type.  Is it possible to have more than one style?  Ok, I really should get back to the origional question.  Do you like the sponged or non-sponged look?  

Finally, I can't forget to credit the Ribbon Carousel Challenge blog for the sketch inspiration.


Supplies:
Stamps: Stampendous Cling Rubber
Ink: Memento
Paper: My Mind's Eye (designer paper), Memory Box (card Base), Stampin' Up Very Vanilla (stamped image)
Accessories: Corner Rounder, Cuttlebug, Spellbinders, Ribbon, Lace, Buttons, Floss

More Color Combinations

Monday, April 23, 2012


In my previous post I showed you a one-layer card for the One-Layer Wednesday Challenge. I was pleased with the simplicity of that card and the fact that I could mail it with no additional postage, no box, and no trip to the post office, that I decided to try some different color combinations.


I decided to add a sentiment to the second card. One can never have too many thank you cards, I always say!
 
It must be the way I cropped the photo in the "blue" card because it doesn't look balanced in this photo. In real life, both cards were measured and stamped alike. I'm still working on my PhotoShop skills. This could take some time.
 
Supplies:
Stamps: Impress
Ink: Memento - Rich Cocoa, Potter's Clay, Cantaloupe, Summer Sky & Danube Blue
Paper: Stampin' Up - Whisper White
Accessories: Bling

Happy Stamping...

One-Layer Wednesday 85

Tuesday, April 17, 2012

This week's OLW challenge; Use no words or sentiment on the outside of your card.

My inspiration for today's card is Spring.  I love Spring!  My big girl was born on the first day of Spring.
 
 
 I've only lived in the south for a few years (I'm originally from Southern California, Santa Barbara to be exact).  In Southern California, Spring is something we only heard about, but never really experienced. Each year, here in Atlanta, I'm amazed by the beauty that this time of year brings.  It's truly Spring in all it's glory with the Azaleas, Dogwood, Cherry Blossoms, Daffodils, and so many more of nature's incredible gifts.

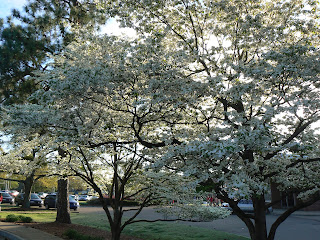
Below is a picture I took a few weeks ago at the University of Mississippi.  We were there for a college tour/visit for my oldest daughter.  The Dogwoods were in full bloom.  It was breathtaking!

   
Supplies:
Stamps: Impress
Ink: Memento - Angle Pink, Rose Bud and Rich Cocoa
Paper: Stampin' Up - Whisper White (card base), Making Memories - (envelope)
Accessories: Bling

Make every day count!

An Idea For Your Ribbon Scraps...

Monday, April 2, 2012

I love ribbon and I'm always looking for ways to use it. As I was cleaning off my work table yesterday, I came across several smaller pieces of ribbon. These were the leftovers from other projects. Thinking they were too small to do anything with I through them out. And then it hit me. I could use these on paperclips! A few years ago I had seen something similar in a magazine.


These paperclips can be used for so many things.  They make great place holders in magazines, cookbooks, and catalogs.  They can also be used as an embellishment for your scrapbook pages.  I'm planning on making a few more to use in my planner. 

Supplies: Paperclips, glue, and ribbon scraps.

Have a great week!

Copyright © 2014 · Designed by Pish and Posh Designs